Originally published in Model Railways in 1974
Centrifugal casting has for many years been one of those production methods with which I have had little success; certainly not the sort of success that others could be recommended to emulate.
The basic process of centrifugal casting is very simple indeed. A mould is prepared in which the multiple casting cavities are arranged like the spokes of a wheel about a central in-gate. The wheel is rotated at some suitable speed and molten metal is poured into the in-gate. Centrifugal force then throws the metal into the mould cavities taking up every detail.
This process has been used for many years by the trade to produce many excellent white metal kits. Similarly, centrifugal casting has been combined with the `lost-wax` process to produce those highly detailed brass parts we would all love to use but cannot afford.
The lost-wax process was the first to draw my attention. The basic idea is simplicity itself. All one has to do is to make a number of wax replicas of the desired castings and attach further pieces of wax to the replicas to form sprues, etc. Dental plaster is then poured around the wax and allowed to set. The block is allowed to dry and then heated to boil off the wax, so leaving the necessary mould cavities within the block of plaster. Molten brass is poured to fill the cavities and, when cool, the block is broken open to reveal the castings.
The process seemed to me to be simplicity itself. Combined with the centrifugal casting principle I could not fail to produce dozens of lovely castings in shiny brass.
I started and finished my experiments one never-to-be-forgotten day about seventeen years ago. I was younger then and even more foolish. We had not long been married and were living with my mother-in-law (not noted for her tolerance or railway enthusiasm) when the daylong absence of both wife and mother-in-law seemed too good an opportunity to miss.
A day devoted to lost wax centrifugal casting seemed indicated. The wax originals were prepared rapidly, assembled on to sprues, built up into the approved wheel-spoke pattern and suspended inside one of mother-in-law`s cake tins. Plaster was poured into the tin, covering the whole assembly. Time was at a premium I wanted to be well and truly cleaned up before anyone came home and as soon as the plaster was set the whole lot was popped into the oven to dry out and to melt out the wax.

The smell was interesting! By opening the back door and the kitchen windows it was just bearable. Meanwhile, I was busily melting brass.
In the kitchen there was one of those coke-fired Ideal domestic hot water boilers with a removable lid at the top for loading and a flap at the bottom for ash removal. The `blow` end of the vacuum cleaner was inserted into the flap at the bottom and the boiler topped up with coke. With the top lid removed and the ladle nestling among the dancing flames it was no problem to melt the brass.
The atmosphere in the kitchen became even more interesting.
The plaster block was removed from the oven, extracted from the cake tin and secured to the turntable of an ancient, wind-up gramophone from which the governor had been removed. With gramophone fully wound, I took the brass from the Ideal boiler. Contact! On went the gramophone and in went the brass. There was a loud `crack` as the mould disintegrated and, instead of castings, I had a horizontal spray of red-hot brass.
Luckily, I was wearing a leather apron and escaped without injury; not so the kitchen: there were small spirals of smoke rising wherever the brass had fallen.
Casting the empty ladle into the garden, I leapt into action with water. As the last wisp of smoke receded and apprehension replaced enthusiasm there was a curious sense of timeless silence, broken only by the frantic oggle-oggle-coggle oggle-coggle of the furiously boiling Ideal boiler.
Curtains
Curiously, the physical damage was small; the bottom of the curtains were badly holed and there were many scorched spots on the lino, but a quick raid on the airing cupboard replaced the curtains and floor polish hid the worst of the scorched lino.
The smell took longer and, despite my efforts, was to reappear later for I had not succeeded in removing all the congealed wax from inside the oven.
If I may draw a moral or two from this story; make sure you know just what you are doing before you start experimenting, do not try to carry out experiments in a rush and, above all, keep out of the kitchen.
Please do not attempt to repeat this particular experiment using the foregoing as a guide. Disaster is guaranteed.
Pattern
On a more serious note however, I do want to discuss the sort of centrifugal casting that can be done on the kitchen table without danger of divorce or decease. The process to be described uses rubber moulds and the lower melting point white metals.
For a start, let us consider the patterns. These can be made of metal, plastic, wood, cardboard or anything else you fancy, even modeling clay and plasticene.
Just remember that the surface finish on the final casting will be a very accurate reproduction of the surface finish on your pattern and that a finger print embossed on the surface in congealed glue will be reproduced faithfully on every casting.
Since we are going to cast into rubber moulds there is no need to bother about undercuts or draft on the pattern because the rubber can be flexed or slightly stretched to extract the casting from the mould. Naturally, the greater the degree of undercut the more flexing the mould has to undergo and the shorter the life of the mould. A good surface finish will also make extraction easier.
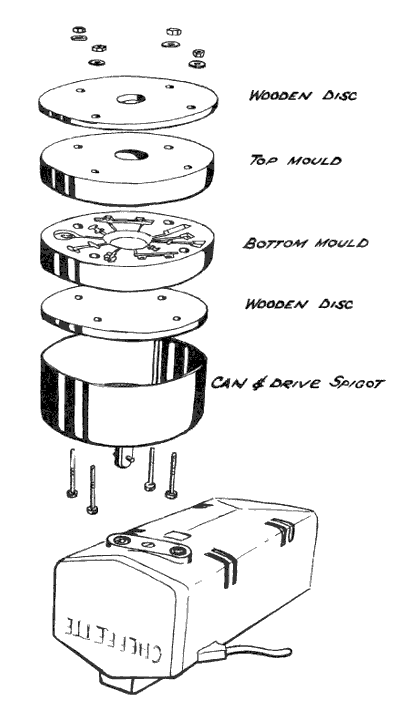
For the centrifugal caster itself we must return, albeit gingerly, to the kitchen. What is required is some means of rotating the mould at about 300 to 500 rpm, with some degree of speed control. The Kenwood Cheffette food mixer fills the bill admirably. The mixer blades are unplugged and the caster plugged in their place.
The caster is very simple, merely a tin of about four inches diameter and about an inch and a half deep. To the bottom of the tin is soldered and screwed a flanged spigot to engage the mixer. A couple of wooden discs are cut to fit inside the tin and four holes are drilled through both the discs and the base of the tin. The sketch will explain what I mean.
Mould
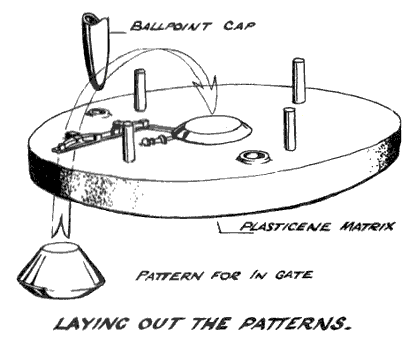
To prepare the mould, a piece of plasticene is rolled out about 3/8in. thick, and the tin is used like a biscuit cutter, producing a close fitting disc of plasticene. The plasticene disc is pressed down firmly into the base of the tin and small pegs inserted through the holes in the base of the tin, passing right through the plasticene and projecting upwards inside the tin by about an inch.
Into the centre of the plasticene is pressed the pattern for the in-gate. The shape of this is vaguely reminiscent of an Apollo space capsule but is best explained by reference to the sketch. The pattern is pressed into the plasticene, narrow end foremost so that it is embedded up to its greatest diameter.
The patterns for the actual castings are now pressed gently into the plasticene up to the proposed joint line. Awkward things like the arms of model figures should have the surface of the plasticene built up to support them.
Short lengths of cocktail stick are cut and used to form patterns for the separate passages leading from the main in-gate to the individual patterns. The placing of these passages is quite important. They should be as near radial as possible and should enter the mould cavity at the point nearest the centre of the disc.
Try to avoid a situation where the outward flowing metal will be expected to flow inward again to fill the mould. Careful placing of the patterns can help here.
A couple of small depressions to provide location for the two parts of the mould complete the work at this stage. The ideal implement for making these depressions appears to be the cap of a BIC ballpoint.
The mould itself is made of silicone rubber; this is a two-part mix consisting of a base of fairly thick consistency and a setting agent. When the two are mixed together a chemical reaction occurs and the mix cures to a tough rubber like mass. Details of sources of supply are given at the end of this article.
When mixing the silicone rubber care must be taken not to entrap too much air, that is to say, stir it slowly and steadily like a Christmas pudding, do not whisk it up into a froth for a soufflé. (You can guess who watches the Galloping Gourmet on T.V.).
Do not hurry the job; the rubber is very slow setting so there is no point in rushing. Mix up just enough to make a layer about three sixteenths of an inch thick over the largest pattern.
Now pour a little of the mix on to each of the patterns, let it flow out into a thin coat over each one. Wait for a moment to allow it to settle and break all the bubbles adhering to the patterns. Do this job thoroughly and pour on the remainder of the mix gently.
Put the whole thing on one side to set for at least twelve hours. It may require twice that long if the hardener proportions were not quite correct but do not despair, it should set eventually. Raising the temperature does not seem to speed the setting process very much. It is just a case of waiting.
When it has set, the pillars can be pulled out and the rubber mould stripped from the plasticene bed. The patterns are now prised out gently and all traces of plasticene removed. The meniscus edge of the top surface is removed with a pair of scissors.
The plasticene bed is dug out of the tin and the rubber mould is put in its place, mould side uppermost. All the patterns and the pillars are replaced in the mould and the whole of the surface of the rubber is given two coats of release agent. (Details at the end of article). Don`t worry if it gets on the patterns, it will probably do them good! Repeat the rubber mixing and pouring caper and again wait for it to set.
Remove the whole lot from the tin, remove all the patterns and examine the mould cavities and passages carefully. Remove any unwanted webs of rubber with a wet modeling knife.
Now for the actual casting - at last (that bloke Binnie does go on a bit, doesn`t he?). The two halves of the mould are placed between the two wooden discs and put inside the tin. Your clamping screws are passed through the base of the tin, through the wood-mould-wood sandwich inside and the whole assembly nipped up gently with four nuts until tight.
The spigot is placed in the mixer and power switch on. The molten metal is poured into the in-gate steadily. The machine is switched off after about twenty seconds and the castings extracted.
What could be simpler?
The melting of the metal can be carried out in an old tin can but it is much nicer to make a little ladle. The one I made consists of the cup-shaped pole piece from an old loudspeaker. You probably know the thing I mean. It is the smooth, rounded projection in the centre of the back. To this is welded a short length of quarter inch diameter steel rod to form a handle. The job is finished by fitting an old file handle to the rod.
The metal used for casting rather depends on the rubber. If the lower (and much cheaper) grade is used then we are restricted to the low melting point alloys. These are the Cerro range of alloys and I endorse the suitability of Cerrobend or Cerrocast for our purpose. The melting point is about the same temperature as boiling water, so they are very safe to use. There is a snag, however; they are comparatively expensive.
With the better grade of silicone rubber we are not so restricted. With an upper temperature limit of 500 degrees F, all the basic white-metals can be used. Some of the freer-flowing soft solders and even some of the zinc-based alloys are possible. The range is wide and the metals are a lot cheaper. The snag is that the moulding rubber is fairly expensive.
I use PVA Release Agent. ( The PVA Colin is referring to is Polyvinyl Alcohol not Polyvinyl Acetate the common white wood glue.)
My thanks are due to Bill Coffee and Bob Brown of the USA who first published details of a food mixer caster in Bob` excellent model railway magazine `Fine Lines`.