This month we will make a start on the vast subject of metal castings and will commence with the casting of the low melting point alloys.
The alloys l mean are those composed mainly of lead, antimony, tin and bismuth such as one used in the manufacture of the well known cast kits.
These alloys melt at or near the boiling point of water i.e. from 80°C to 125°C depending on the composition of the alloy.
I first met these alloys about twelve years ago when an engineering salesman tried to impress me with the alloy`s possibilities. He warbled on about the things one could do with the material. He even produced a paper bag, melted some of the alloy and poured it in. Moments later he was showing us a perfect casting of the inside of his paper bag. I listened, showed a lot of interest and finally got a free sample.
Cardboard Mould
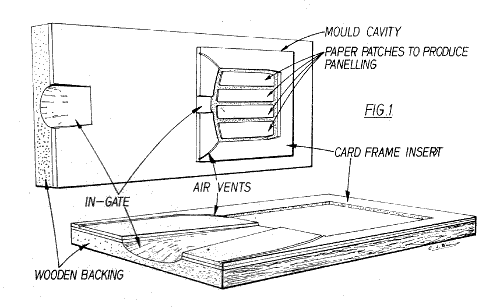
Once I was home with my loot, I set to work and made a mould. This was made from cardboard and paper and worked very well indeed. The original mould was for ‘S’ gauge L.B.S.C. coach ends, complete with panels, etc., and is shown in Fig. 1. Note that the location between the two halves of the mould was obtained by cutting a rectangular piece from the centre piece, sticking this to one side of the mould and the ‘frame’ to the other. This technique I have used as standard since then and have had no location troubles at all.
This original mould managed to produce about fifty parts before it finally collapsed. It was made of raw, unpainted, uncoated paper and card, however, and much longer runs have been obtained from subsequent moulds which have been given a coat or two of polyurethane varnish.
It is important that the edges of the paper or card components of this mould are well sealed, of course, since the molten metal will run into almost any crevice and extraction of the component then results in damage to the mould. The in-gate should be fairly long, say four inches from the top of the component, to give sufficient pressure in the mould to reproduce fine detail.
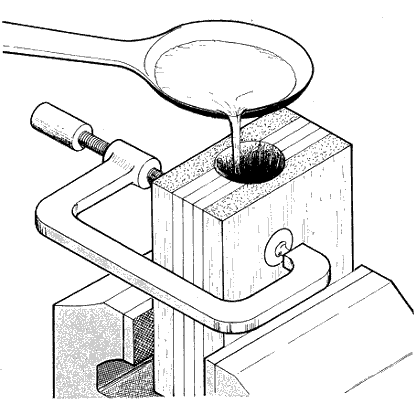
One other requirement is for the mould to be well vented. If the air cannot get out, the metal cannot get in! In use, the mould is clamped in the vice by the lower end and a second clamp placed around the upper end.
The alloy is brought up to melting point on the gas stove, being careful to ensure that it is not overheated—it doesn`t have to boil! The mould is filled steadily and without interruption of the flow and then left for a moment to cool.
The mould is then opened, a quick heave on the solidified sprue (the metal formed in the in-gate) and out comes the first part. Break off the sprue and throw it back in the melting pot, re-assemble the mould and away we go again. Great fun!
The low melting point alloys used are obtainable from a number of sources; Messrs Fry`s do their ‘Tandem’ alloys for costume jewellery, which are as cheap as any and quite suitable. Messrs Holts do a version which I have not tried, whilst the ‘Cerro’ range of alloys available at large tool stockist`s as ‘Cerrobend’, ‘Cerromatrix‘, etc. are really first class, if somewhat expensive. Buying ‘Black Fives’ and the like is an uneconomic way of obtaining the alloy, since more than one kit is needed to fill the ladle.
We have talked about the use of low melting point alloys and the way that their properties of free flow and low melting point allow the use of mould materials denied to other metals.
Dental Plaster Mould
Last month we considered the use of card as a mould material; this month we shall look at moulds made of dental plaster, glass fibre and rubber. The method is very similar in each of these cases with certain special points to be observed on the merits and limitations of each material.
I propose describing the making of a mould in plaster and then noting the differences for the other materials.
The first thing we must make is an original pattern; for use in plaster it can be made of almost anything, the only requirements being that it be smooth, non-porous and have adequate draft.

The original pattern may very well be made of wood, card, plastic or metal, but if made of wood or card it must be varnished and de-whiskered. The pattern must have adequate draft (what a masterpiece of understatement!) which means that, as in figure 1, the pattern must be so shaped that it releases easily from the newly made mould and that the subsequent castings do the same.
The next item to be considered is the metal ring in which we make our mould. This is shown in fig. 2 and should present no difficulty, even to the most ham-fisted. Now, having made the master and the mould ring we can get under way. A lump of Plasticene is rolled out to approximately half an inch thick and the pattern is embedded in it.
When this is done, the surface of the Plasticene must coincide with the intended parting line. A little judicious poking and prodding at the surface of the Plasticene often helps at this stage. Location dimples are pressed into the surface of the Plasticene and the mould ring pressed down around the working area like a biscuit cutter. The ring, however, is not removed, but has the external surplus Plasticene pushed up against it to render it leak proof.
This stage is illustrated by Fig. 3. Now take a deep breath, go and fetch the plaster, a small pot, some water and a can of spray-on furniture polish. Give the pattern and the Plasticene a quick spray with the furniture polish to help the embryo mould to come apart. The polish is best sprayed on to the bench and applied from there to the pattern with a small soft brush if the pattern is particularly interacted.
Give it a few moments to dry and start mixing the plaster. Put the dry plaster in the pot, add water whilst stirring until a creamy consistency is obtained. Take a small cheap paint brush and slop a quick coat of plaster over the pattern. This is immediately followed by pouring the bulk of the plaster into one corner of the ring and allowing it to flow across the pattern until the whole surface is covered and the mould ring full to the top. At this stage l usually give the bench top a few gentle taps with the hammer to dislodge any air bubbles. The plaster takes time to set and develop its full strength, so please do not go fiddling or taking a little look at the job for at least half a day.
When the plaster is set, the screws on the mould ring are released and the whole thing dismantled. The Plasticene is peeled off the plaster and the pattern very gingerly eased out. The edge of the mould itself will probably have some very thin plaster edges which should be carefully scraped away. The surface should now be cleaned gently of all loose bits of Plasticene and given a coat of polyurethane varnish or Rustin`s Plastlcoat.
The pattern is returned to the mould when this has dried, the mould placed back in the ring and the whole exposed surface of the pattern and mould given a coat of polish. Plaster is mixed and poured as before to fill the other half of the ring and left for another half day.
The ring is again removed and the two halves gently prised apart. The pattern is removed and the edges of the mould cleaned. Now we have two half moulds each a perfect fit against the other and with a mould cavity in the centre.
Gate and Vent
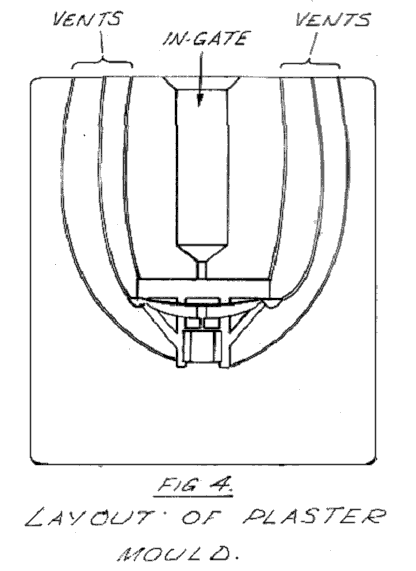
The only feature lacking are the means of getting the metal in and the air out. The `ingate` or way in is gently scraped into the surface of the half moulds with a modelling knife and should be of ample proportions.
Even if the mould is such that only a small ingate is practicable into the mould cavity itself there is no reason why the main section of the ingate should not be large.
We do, after all, want to fill the mould with hot, free flowing metal and it is obvious that if we try to make the metal flow down a long thin ingate we shall not even have that ‘trickling stream of lukewarm cream but a solid, frozen chunk.
The philosophy of the in-gate may be summed up as `keep the metal together until the last possible moment!`
Now for the venting. Vent all the top corners and blind runs in the mould as a matter of course; if possible bring all the air vents to the top separately. As with the in-gate, be generous with the vents, remember that the incoming hot metal will heat the air enclosed in the mould and expand it considerably. This has to escape before the metal can get in.
Bubbling in the in-gate as the metal is poured usually indicates poor venting.
The metal should flow in quite smoothly. I apologise for labouring these points but more disappointment is caused by poor venting and badly proportioned in-gates than anything else.
Having scraped in the in-gates and the more obvious vents, give the raw plaster a coat of polyurethane or `Plasticoat`. Whilst the mould is useable without, these coats of heat resisting varnish do prolong the mould life enormously. Rustin`s Plastlcoat, being a two part mix similar to the epoxy resins, is particularly useful. Put the finished mould on one side to dry thoroughly (two days in the airing cupboard is ideal).
Do not attempt to use a mould which is not thoroughly dry.
Always ensure that this is so, even with an old mould; plaster can become damp quite easily and raw plaster will absorb water like a sponge. Hot metal, plus water produces steam, suddenly and in quantities sufficient to shatter the mould or spray hot metal back through the in-gate.
The production of castings should now be a simple matter. The mould is clamped together with a small ‘G’ clamp and stood upright in a baking tin on one corner of the gas stove. The metal is melted in a suitable container, the dross on the surface swept to the rear and the molten metal poured into the mould in a steady stream.
Allow the mould to cool and the metal to solidify and open the mould. Gently ease out the casting, clamp up and pour again. This can become a fairly rapid operation with practice but it should not be rushed.
If several clamps are available it is a good scheme to have several moulds going at the same time, dividing them into two groups and working as follows: Fill group one: remove castings from group two and reassemble; fill group two; remove castings from group one and reassemble. Repeat ad-nauseam.
The first cast in a new mould is best allowed to cool completely since it tends to stick more tightly in the mould than subsequent ones and a mould may be damaged by awkward fumbling when it is hot.
Flexible Mould
So much for the basic technique, with a few modifications here and there, it will serve for all moulds made of ‘pour and set‘ materials. Now let us look at the flexible materials. They come in two basic varieties; silicone rubber types, which are a two part mix and which, when once set, cannot be re-used, and the vinyl group which can be melted and re-used. The silicone rubbers are available from two sources in England, from l.C.l. under the name of `Silcoset` and from Midland Silicones under the name of `Cold Cure Silastomer`. (The addresses are l.C.l. Silicones Group, Stevenston, Ayr, Scotland and Midland Silicones Ltd., Reading Bridge House, Reading, Berks.) Midland Silicones also have got a new material specially for this application with a higher tear strength, this is known as `Silastomer 72`. When ordering this material it is best to state for what it will be used, as not all silicone rubbers are suitable. The pourable grade should be specified. The silicone rubber is usually supplied as a pot of uncured rubber of creamy consistency and a much smaller pot of hardener. When mixed in the proportions stated in the instructions the mixture will set in about an hour (dependent upon temperature) into a rubbery mass.
The instructions given for preparing a plaster mould will serve for silicone rubber with the following special points to be noted. Do not stir too vigorously. The rubber and hardener must be thoroughly mixed, but the mixture has a tendency to set before the entrapped air bubbles can escape. The pattern does not require any draft and can have undercuts. Having said that, I would point out that the successful moulder keeps undercuts to a minimum. Whilst the flexibility of the mould enables all sorts of complex shapes to be withdrawn, the tear strength of silicone rubber is not high. In-gates and air-vents can easily be cut into the mould with the point of a sharp modelling knife, using water as a lubricant.
The production of moulds in silicone rubber is naturally far faster than in plaster, since the long drying time is obviated.
The second type of flexible material is vinyl based and the only readily available type I know is `Vinamould` from the Strand Glass Co., High Street, Brentford, Middx. It may be melted in an old saucepan on the stove, but, be warned, the smell of over- heated Vinamould is best appreciated alone! The instructions for plaster moulds serve once again for Vinamould but, since the material melts at a temperature not very much greater than that of the low melting point alloys, care should be taken not to allow the metal to overheat. Similarly, Vinamould should not be used with a plastic or other pattern which is affected by heat.
Glass Fibre
Lastly, there is fibre-glass. Here we have a two part resin which is mixed and used very much like silicone rubber, with the exception that small pieces of glass fibre cloth are laid in the mould ring at intervals during the filling process. Unlike silicone rubber, it will adhere quite firmly to the metal mould ring, the pattern and anything else left about. The pattern, mould ring (and the other half of the mould during the second stage of manufacture) should be painted with at least two coats of the special parting agent and allowed to dry in order to prevent this.
The mould will be rigid when set so that the rules about draft and no undercuts apply. The curing process of the resins used gives off heat, not very much but enough to create a couple of problems. One occurs if the fibre glass is built up into a lump in one go with a thickness of more than, say, 6mm., when it tends to warp and may even split.
The other problem is with plastic patterns, for these may either be affected by the heat generated during curing or may be attacked and partially dissolved by the resin itself. The answer is to give the pattern an extra coat of parting agent and to keep the fibre-glass mould thin. A wall thickness of 3mm. is ample. The air vents can be cut easily by using the cutting hook described in the November issue and the in-gate can be put in with a file.
There are many suppliers of fibre glass in very many forms The variety we want is pourable and the make I use is from The Strand Glass Co., mentioned above, who also make the release agent. I would make the usual disclaimers in respect of the companies mentioned and would stress that ‘Rank Strand Electric‘, who provide my daily bread, have no connection with Strand Glass Co. as far as I am aware.
notes
Since the 1970`s when Colin penned the above Strand Glass has gone.
The Strand Glass release agent Colin refers to is a water based solution of Polyvinyl Alcohol.
The polyurethane varnish used is the old fashioned spirit based varnish.
The modern `eco friendly` water based varnish is not suitable, it will peel off when hot.
Don`t get caught casting in the kitchen while you think your partner is out shoping. Colin was caught more than once.