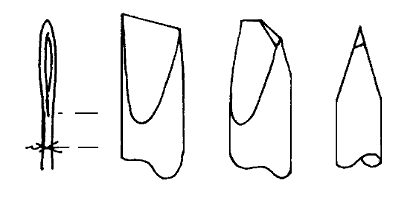
Half Round Wire. A Draw Plate
The draw plate merely consists of a hole of the desired shape in a piece of steel through which is drawn a length of soft wire. In doing so the wire takes on the shape of the hole. Since we are talking half round wire we need to produce half round holes in the drawplate. The attached sketch should explain but I will add a few extra words. To make a half round hole we merely clamp two pieces of steel together and drill a few holes of the desired sizes along the joint.
These holes need only be about 4 or 5mm deep. If we invert the top piece so that the plain face lies across the holes we have our half round holes. Take the bottom piece and with the corner of a file put in a tapered lead to the hole. Be a bit careful and leave about 2 or 3mm of the hole untouched. Rub off the burrs and job is done. Put in a piece of copper or soft brass wire of about three quarter the finished half round diameter and nip it in the notch.

Oil the plate and pull the wire through. Do a bit more than you need. Repeat the dose, nipping the wire a bit tighter each time. By now you should be knee deep in half round wire. Use it for making beading, split pins, handrail knobs etc. The shaped wire can be stretched to get even smaller sizes but that is another method and another story ! Mild steel is quite good enough for our quantities of wire.
My first draw plate was made from an old square door handle spindle. When it does wear out remember that there are the unused half holes in the top plate. Merely file in the leads to these half holes and transpose the blocks.
Use for handrail knobs, Couplings, Door handles etc. For handrail knobs use wire about 3/4 of rail diameter.
Dummy rivet embossing tool or Pimple popper.
Not found Colin`s original description of this so I will do my best.(Peter)
Pimples or dummy rivet heads are embossed into metal strip,`3` by punch,`1` and die,`2`.
Hole,`4` guides the punch. Hole,`5` locates the die.
The work piece is controlled by guides,`6` or `7` which fit into hole,`8` and are clamped in position by screw,`9` in threaded hole,`10`.
Alternatively a side fence or guide,`11` can be fitted to the side of the tool using threaded holes,`12`.
The dummy rivets themselves can be used as a guide,`13`.

One useful addition not shown in the drawing is the fitting of a collar and light spring to the punch. So lifting it clear of the work between rivets.
Punch from hardened and tempered silver steel.
For brass the die does not need to be hard unless you plan to do thousands of rivets.
A very gentle tap with a tiny hammer is required for thin metal. Plastic sheet only needs finger pressure.
For complex curved shapes a template,`14` can be used.
Drills for small holes in sheet Brass.
These are made from piano wire or sewing needles. The local haberdashery will stock packets of `Assorted Sharps` which will provide about twenty drills.
Break needle about 1/8 inch below eye (left). Use an oilstone to put two flats on end like a miniature screwdriver (centre). But the end must be sharp. Hold the embryo drill upright and use oilstone to produce cutting edges (right).
This type of drill will outperform the standard twist drill on sheet brass. When it snatches or breaks only the cutting edge is damaged. It does not break at the surface of the work like a twist drill. Try them you will like them.
Countersinking and idle chatter
Have you countersunk a hole in a piece of brass and found the resultant hole any shape but round ?
Two answers - First, put a small pad of folded paper over the hole and countersink through it. The pad should be about 8 sheets thick and small enough to rotate with the countersink. Use a new pad for each hole. That solves the immediate problem.
For future use make a `D` bit type of countersink as shown above(left). Make from Silver Steel. Alternatively a countersink can be made as above (right) by gashing a cone with the grindstone or file. Relieve the cone behind the cutting edge so that the base of the cone is helical, like one turn of a screw thread. Much easier to do than to describe.
Home made Reamers and `D` bits
The simplest reamer(left) made from Silver Steel. Works well in brass and steel. Sharpen by stoning the flat only. A small amount removed from the tip (A) provides some lead and improves cutting (centre and right). Cutting edge formed by grinding and sharpening to centre line. Plenty of room for swarf, cuts well. Tends to bow when hardening. Easier to grind flat after hardening.
The shaped `D` bit. Used gently works well. Often used to make small venturi`s in steam injectors(right). Note - Confine all sharpening to the flat faces.
Do not be tempted to stone or polish the body after the cutting edge has been formed.
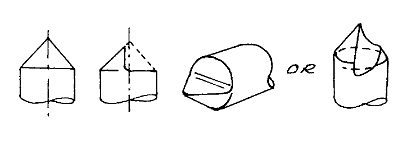
Hand Wheels
Use the male part of a dressmakers press fastener.
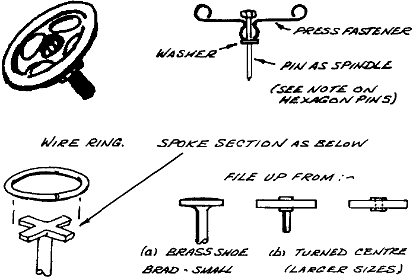
Purchase the bright plated ones. Assemble with solder or araldite. Paint centre and wipe rim clean. Larger sizes may require a few strokes with a file to shape the spokes. Heavyweight fasteners can have the centre hole opened up and tapped. Otherwise solder small piece of brass tube over the `pop` before tapping.
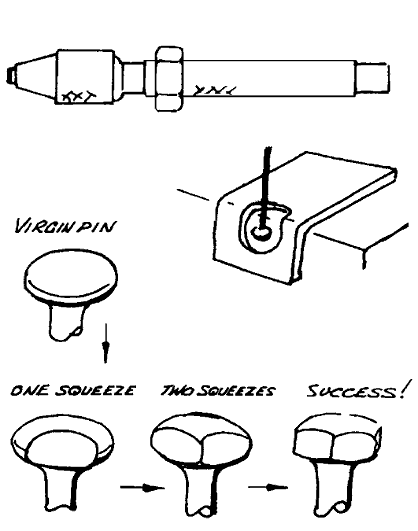
Hexagon Head Pins.
A simple modification to a pin chuck is to push a hexagon nut on to the shank - This has several uses.
1. Hold the pin chuck in the vice by gripping the nut. Small items can be gripped in the pin chuck and the chuck replaced in the vice at its previous angle.
2. Use it when making drills. It is very easy to judge the angle and get the flats in the right place.
3. Use it to make bolt heads. Hold a soft pin in the pin chuck.
The cheap kind sold by stationers not the hardened ones sold by dressmakers.
Place the head of the pin between the jaws of the vice using the hexagon nut in line with the jaws. Squeeze the pin head to produce a pair of flats. Remove, rotate to align the next pair of flats using the hexagon nut as a guide. Squeeze again. Repeat for the third and last time.
A piece of metal of appropriate thickness controls the size of the hexagon after squeezing.
Working 16mm scale padlock
Marking out
Material 0.25mm Nickel Silver. Make light centre pop and scribe 5mm dia circle. Drill centre 0.5mm to suit household pin. A couple of extra holes to enable work to be pinned to a block are useful later.
Spring Frame
Material 0.25mm Nickel Silver. Cut strip 1mm wide and bend to shape shown. Solder push rod to side as shown. File latch edge at 45 degrees Clean up edges by rubbing on fine wet and dry.
Assembly Stage 1
Locate spring frame over scribed line and solder top edge only. Extend central hole to form keyhole using fine piercing saw. Drill number 60 (0.3mm) hole as shown.
The Key
Made from a household pin. Bend head to 45 degrees (more or less). Flatten Head. File to match keyhole. Attach brightly coloured cotton.( or make a dozen spare keys)

The Hasp
Made from 1/2 inch dress pin.(bellow). Flatten head and cross drill number 60 (0.3mm). Bend to shape and file locking notch.
Assembly Stage 2
Lay job on piece of wood and fit hasp on pin as shown. Adjust hasp until it lightly clicks into the spring frame. Try Key. This should come into contact with the push rod and cause the spring frame to flex and release the hasp. Fiddle, Curse and Swear.
Nearly there
Drill hole for key in cover plate. Locate cover plate on pin passing through key hole and into block and clamp lightly. Solder top edge only. Spot and drill hasp pivot through.
At Last
File profile as shown. Matching front and rear plates to profile of spring steel frame. Pass a twist of copper wire through key hole when doing this since it can be very frustrating when grovelling on floor seeking a small lock. Have fun.
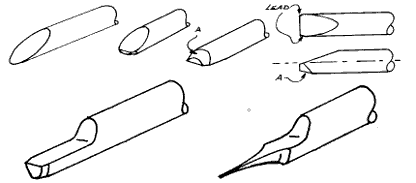
Cutting Hook.
Made from an old hacksaw blade
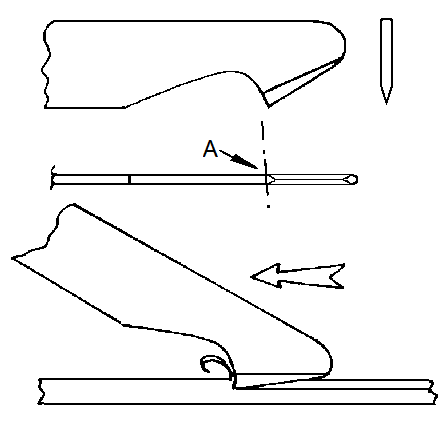
Angle `A` ensures hook tends to move toward guide. Use it like this until bead forms on underside. Flex sheet along cut to separate. Using an old square as a guide the hook enables parts to be cut accurately and flat. If made for an old machine hacksaw blade the heavyweight version will cut 1/2mm thick brass or steel with ease.
Bending Hook.
Just like the cutting hook but with an obtuse edge to the blade.
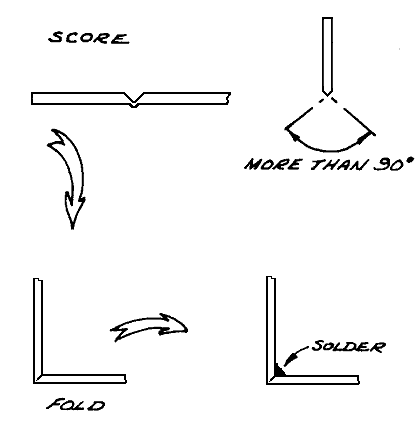
Use as the cutting hook until a bead appears on the underside of the metal. Then fold along scored line to produce a sharp corner. Reinforce with solder.
Planking Hook and pen grip for light work
Many wagons have the top edge of their planks chamfered to shed rainwater. Use this hook to produce the effect.
Alternative for light work. Form the cutting edges on the end of the blade and use with a penholder grip.
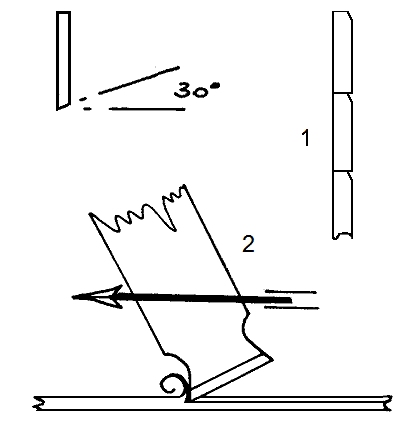
Strip Cutter and Scoring Tool.
Direction of cut as arrow. Pull tool along edge of sheet. Blades made from old hacksaw blade. The ends with the holes.
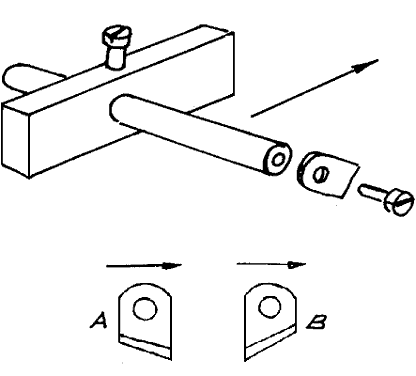
Blade type `A`, Used in the same manner as Cutting, Bending and Planking Hooks. Same blade types used as described there. Blade type `B`, Conventional blade for cutting wood, card etc.
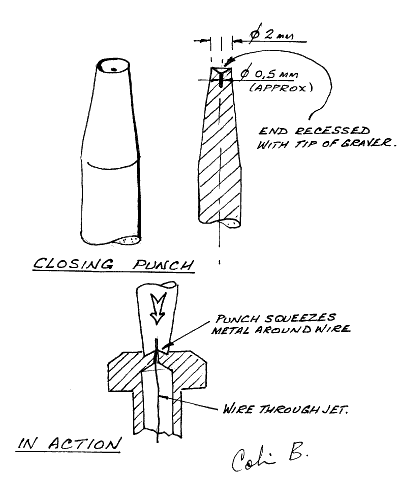
The Closing Punch
Drilling the small holes in gas jets is difficult. Use the closing punch to shrink an over size hole around a fine steel wire which is then removed.
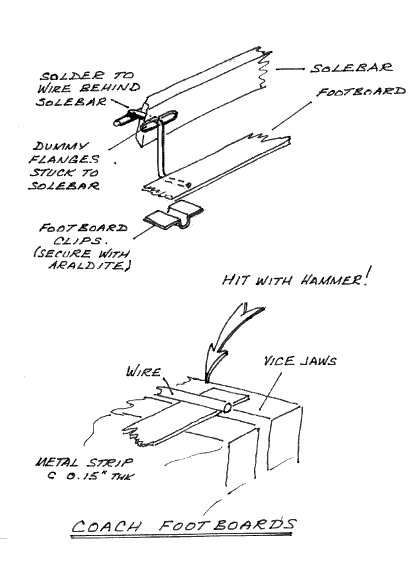
Coach Footboards
Cranks into 1 Gauge wagon Wheels
Take `1 gauge` iron wagon wheels or castings and modify them. I usually do this by drilling the axle hole oversize. Turn a top hat bush to restore the axle hole to size and with a large enough brim to file into crank shape. Drill holes for crank pins. File to shape round crank pin holes Press crank pin into bush with ample surplus on back. Cut spoke away locally to clear the surplus crank pin. Assemble, lubricated with Araldite. Final shaping between spokes with two part car body filler.

That is the basic method but these make it easier
1.Make the bush from rectangular stock held in the four jaw, to reduce the amount of filing.
2. A simple washer shaped jig to drop over bush with a hole at crank pin position for getting all holes at same throw.
3. Make a pair of buttons(top hat bushes without a hole) One of large end of crank/ axle hole diameters and the other of small end of crank/ crank pin diameters. Use as filing guides when shaping cranks.