Overture and beginners please.
The method of coach building I am about to describe owes little to my efforts but has been about for at least sixty years. the ideas are not new, the materials are old fashioned but the results are curiously satisfying. The level of skill required is not high though a degree of patience is required.
The materials are cheap and generally available. In fact the ideal beginners project. With this in mind I propose to be even more pedantic than usual. if the more experienced modeller finds this tedious I can but reply that he should not be reading this but should have written it instead!

A coach is essentially an elegant wheeled box for carrying people, if it is not very elegant and made of metal it is called a car. (Automobile to the colonials)
All the best coaches were more or less elaborately panelled with a projecting beading covering the joints. It is this panelling / beading that proves the major challenge to the modeller.
A reasonable facsimile of a panelled coach can be made by laminating the sides from layers of card and treating the card with a hardening agent.
Materials and tools. Card.
Not surprisingly, the major material of the cardboard coach. The best quality card is undoubtedly Bristol board, available at the art shop at horrendous expense. But I am at hart a tight fisted skinflint so I like to use ordinary manilla folders beloved of office staff everywhere. I have also had success with the hard card from which filing cabinet pockets are made. Donald Boreham, may his shade rest in peace, swore by the card covers of the Birth, Marriage and Death Certificates which were the stock in trade of a Registrar.
Glues.
Ordinary white PVA. For some jobs it may be thinned with water. Epoxy i.e. Araldite, both rapid and the slow cure variety.
Wood
Any of the finer grained hardwoods will do. Obeche, Ramin, Lime, Mahogany and Holly all work well. I only use Balsa for two jobs i.e. Internal panelling and roof support.
Hardening Agent
Here I stick my neck out when I declare there is nothing so good, so perfect for our purpose as shellac. I do not mean those miserable bottles of shellac varnish nor bottles of French polish, button polish or knotting with their added waxes and plasticizer but good old fashioned shellac. It is getting rare but I can still buy it at my local hardware shop (ebay).
It is prepared by dissolving in methylated sprit in a small coffee or similar jar and it is worth making it in three consistencies. Gooey, creamy like paint and runny like milk.
I have used proprietary wood hardeners, well thinned cellulose and coffin varnish but I shall use shellac in the future.
To achieve that deep down protection and hardening the hardener must penetrate deeply. The surface hardens and the deep down solvent slowly, oh so slowly, rises to the surface. If it is a solvent which can attack the subsequent paint job it may damage it months later. I have a Festiniog curly roof bogie van, fully lined and lettered which is developing a cracked surface that would do justice to an old master.
I have used proprietary wood hardeners for general outdoor use with success but I am not prepared to risk a complex paint job again when I have shellac and I know it works. Sure sign that I`m old. No spirit of adventure
A couple of scalpels and spare blades. I like to use the short straight scalpel for general work and the curved blade to cut into a corner. A fine whetstone for keeping the blades sharp.
Pencil about 2H, wooden not collet or propelling. Some means other than the scalpel for sharpening same and bits of abrasive paper for keeping the lead pointed. An engineers square. For this job something in the 3 to 6 inch range will be fine. A useful extra is a 12 inch square.
A steel rule. A useful modification is to stick a piece of electricians insulating tape along the underside. This makes it lass likely to slip when using it as a straight edge when cutting. There are a couple of special tools which we will discuss when the necessity arises.
The Prototype
We have dealt with all the boring stuff so let us have a quick look at a typical full sized coach to refresh the image in our imaginations. Referring to my crude sketch there is a main frame with apertures for the doors.
There is a longitudinal rail below windows and if height permits, another above them. To this frame is screwed the panels and to keep the weather out of the joints a system of beading or capping strips is applied over them.
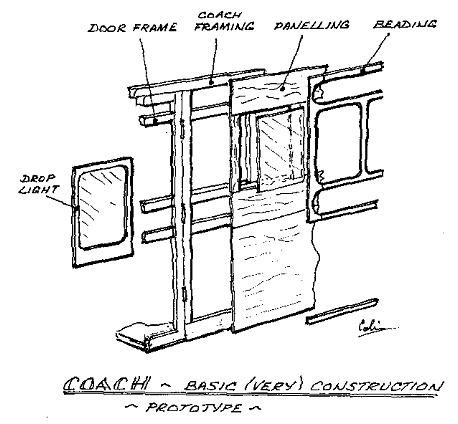
The constructional requirements of a coach naturally have an effect on its external appearance. The end of the coach has a substantial frame in its own right and this naturally takes up more space than the flimsy compartment dividers.
Thus the beading/ panelling at the end of a coach side tends to be wider than that at the door or compartment divisions. The window glass in the main frame is usually fixed.
It is inserted into the mainframe from the inside up against the rear of the panelling or beading and screwed in place with an inner window frame screwed to the main coach framing.
Within the door it is usual to have a sliding window usually refereed to as a drop light.
This is contained within its own sliding frame which drops behind the door panelling. The glass of the drop light is thus set slightly deeper into the coach than the other windows.
Hopefully, despite my efforts you now have a rough idea of the construction of the prototype.
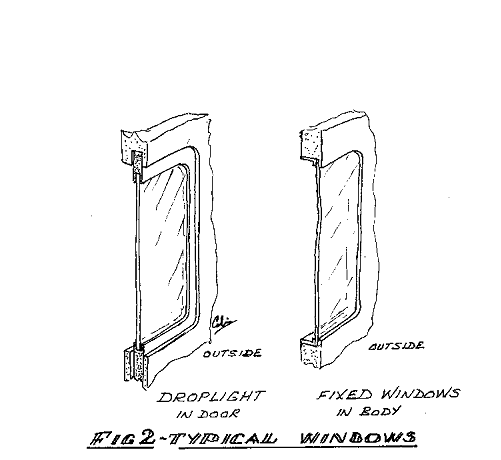
Fig 2 attempts to portray the construction of typical windows. We will attempt to model this in all its glory by laminating the side from thin card.
Be warned! The way ahead looks daunting but is actually very simple, Just give it a try.
Act One
The coach sides will be laminated from at least six layers of card and looking at my sketches they look far more complex than they actually are.
Follow the system laid out herein and all will be well. ( Trust Colin to frighten the horses!)
Fig 3 is an exploded view of the door area of a typical coach.
Layer 1 is the beading overlay with the external panelling cut into it.
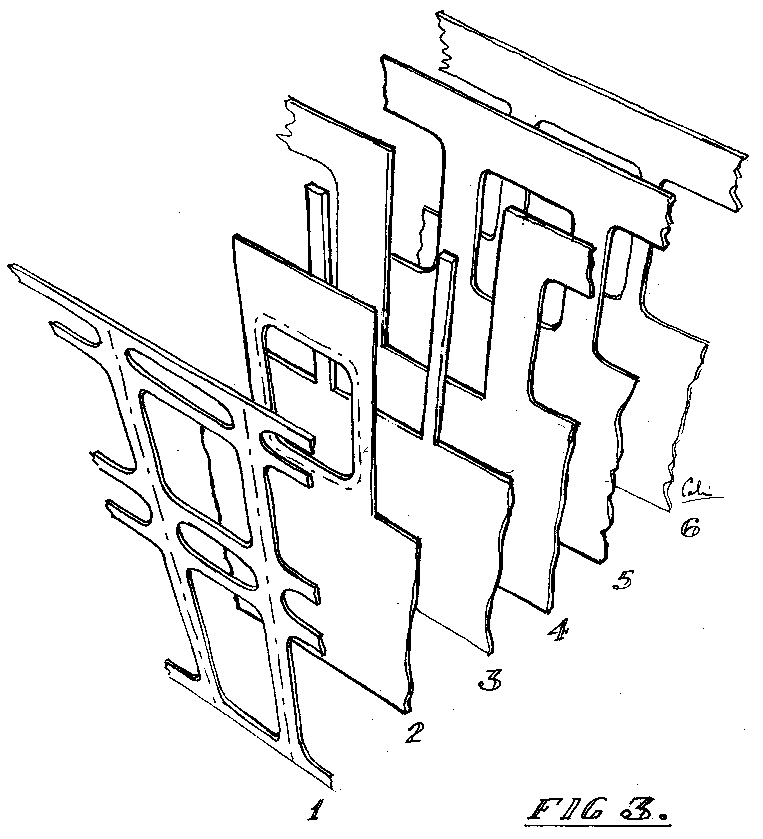
Layer 2 has an aperture which will form the front of the droplight frame, this is therefore slightly smaller than the window aperture in layer 1. In the quarterlight position
( windows either side of the door ) the card is cut away to form a pocket for the glazing.
Layer 3 continues the quarterlight pockets rearward and introduces a pocket for the droplight glazing.
Layer 4 contains the quarterlight inner frames and extends the pocket for the droplight glazing.
Layer 5 has the droplight inner frame and the slightly larger recess of the quarterlight position.
Layer 6 brings the droplight aperture back to full size and repeats the quarterlight aperture of layer 5.
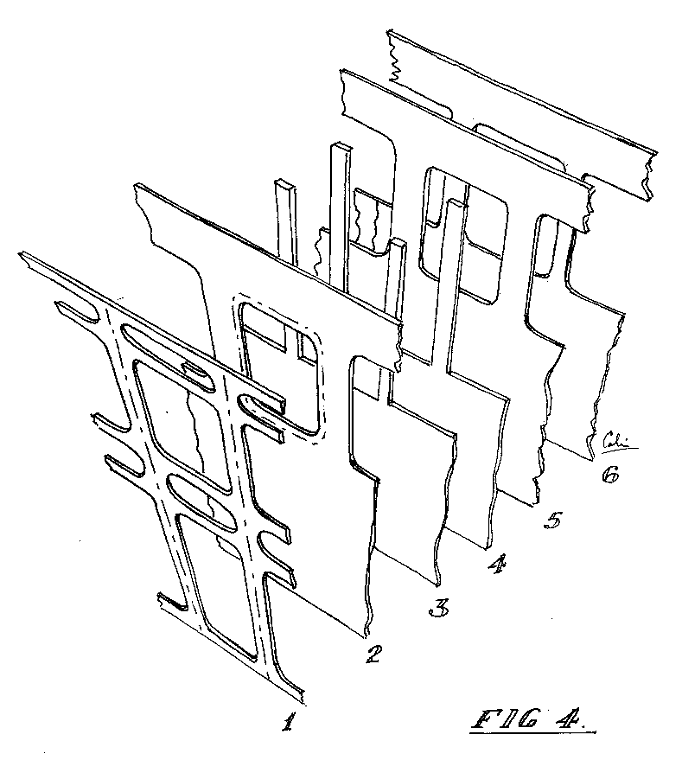
Fig 4. is a similar scheme for a coach where droplights and quarterlights are at the same level. You may puzzle this one out for yourself.
By now you should be totally bewildered but all the best plays do that.

Overture just fill in time while the audience settles and finds the potato crisps.
Act One introduces the characters and creates confusion.
Act Two starts to unfold the plot and undo the damage done by Act One.
Act Three limps along explaining what has become obvious.
Any further Acts clear up the mess and the finale tries to show how cleaver we all are.
So on to Act two.
Act 2
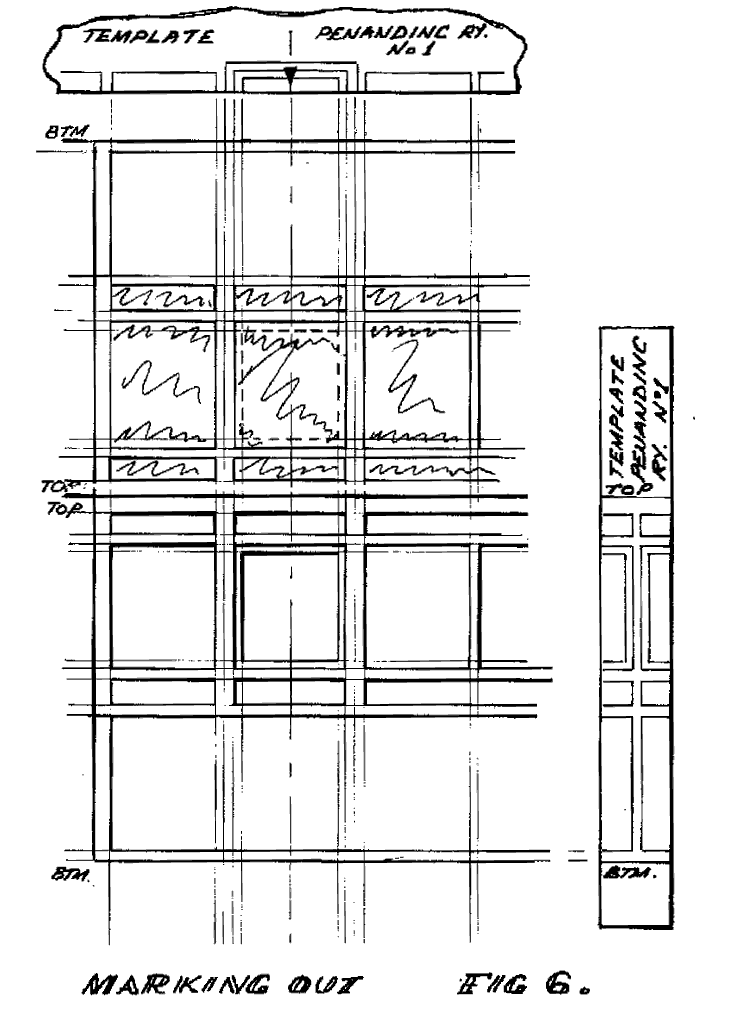
Without further ado let us get on with construction and to do this we make a stack of the six card sheets that will be our coach side plus one extra sheet. The sheets should be large enough to make both sides of the coach with at least a couple of inches to spare.
The sheets are glued together along one side and each layer except the bottom one is folded back so that they open like the pages of a book.

Each fold needs to be a little farther forward than that of the layer above to allow it to fold well clear. Make sure they are well creased and fold easily. Pencil the layer numbers in the corner of the sheet, top layer 1.
Fig 5 will show what I mean.
Mark out both sides of the coach on layer 1. The sides should be drawn as a pair, bottom to bottom edge or top to top. I personally like to work top to top since the delicate bits in the upper side are kept in the middle of the sheet.
Thus the coach side is seen upright in the lower position and its mirror image is inverted above it. Marking out is simplified enormously since all the vertical markings are drawn across both coach sides. It also ensures that both sides will be a matching pair.
Most prototype coaches from a given company tend to have doors and quarterlights to a standard pattern, so making door and window placement easy. We can take advantage of this by making a template (posh name for a bit of card with markings on it!) of the horizontal dimensions of the door and quarterlight and quarterlight area with reference to the door centreline.
We merely mark the door centreline`s on the coach side and transfer the dimensions from the template. If a number of coaches is planned it is worthwhile using the other side of the template for the vertical positions and widths of the beading.
Now write the name and type of coach on the template and when you have finished marking out, put it away carefully for future use. I must have dozens of templates stored in envelops. I only whish I could find them! Now shade in the bits we are going to cut away to leave the top layer of the beading.
Check and check again.
This is the point of likely error and beyond this point there is no erasure. Hopefully fig 6 will clarify my poor words.
Cutting out
When layer one has been cut (remember do not cut the perimeter), fold layer 1 up and out of the way. Layer 2 will be found to bear the scars from cutting layer 1. Treasure the scars for these are your guides for cutting layer 2.
Fold layer 1 down again and mark out the droplights on layer 2. Shade any apertures that are to carry through unchanged. Mark out the window pockets for the quarter lights, slightly larger than the window aperture in layer 1.
Cut the apertures in layer 2. Fold layer 2 out of the way and again using the cut marks as a guide mark out and cut layer 3.
With layer 4 we have a slight change in that the quarterlight window inner frames get smaller again and need to be the same size as the apertures in layer 1.
Obvious, fold down layers 3,2 and 1 and lightly cut mark the outline using layer 1 as a guide! Fold layers 1,2,3 out of the way and cut holes in layer 4.
Layer 5 deals with the inner droplight frame in a similar manner to the quarterlights in layer 4. However the quarterlight apertures themselves increase inside the coach so the apertures in layer 5 are about 1mm larger all round than those in layer 4.
Layer 6 is the last one! Repeats the quarterlight aperture from layer 5 and increases the size of the droplight aperture to that of layer 1.
Admire but do not fiddle. Your card has nice sharp edges, the more you mess about the more woolly they become.
Round Corner Panelling
I have used several different tools for this job, none is perfect. They are:-
The multi-hole leather punch. This is the plier like device with the rotating battery of hollow punches beloved of art and craft shops. Not bad, cuts cleanly, but suffers from lack of reach for our purposes.
The wad punch. These are the hollow punches sold for punching holes in gaskets etc. Too heavy, too clumsy and need heavy resharpening to a thinner edge before use.
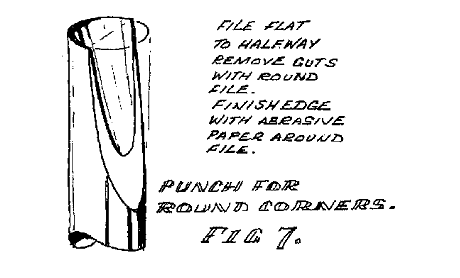
The home made punch. So easy to make. see fig 7. Can be of mild steel but is better in silver steel and hardened. Since the cutting edge is on the inside it compresses the waste not the work. It does the job well with a little practice. My personal favourite.
When doing round cornered panelling cut the corners first. The straight cuts can then be located by hooking the point of the scalpel in the curved cut at each end. Locating the punch with reference to the straight cuts so that the curve flows smoothly is beyond my small skills
Act3. Gluing up
Slip a bit of polythene sheet between layer 6 and the spare layer. Using PVA white glue thinned with water stick layer 5 to layer 6, continuing up the stack to layer 2.
Do not stick layer 1 in place yet. Slip a piece of polythene between layers 1 and 2 and place the entire stack under a couple of heavy books for at leas 24 hours.
Remove the polythene and trim the solid lump that is layers 2 to 6 to final length, removing the end trimmings. Do not cut top and bottom.
Fold down layer 1 and glue in place. Back under the heavy books for another 24 hours.
Finally, cut layer 1 slightly over length. about 3mm projection beyond the rest of the layers at each end will do fine. Not very fussy as we will be timing these tabs back on assembly.
Cut the top and bottom edges of the sides, at last freeing the pair of sides from the stack.
Draw a deep breath and relax.
Ventilators
Here I mean those awkward things that sit above the doors. They are there to infuriate modellers and seem to exist in two varieties. see fig 8
The first is the simple sloping hood to keep the rain out of the air hole through the door. Construction is so obvious from the sketch it needs no further words.
Second is the louvered type. Looks as though invented by the devil but easier to make than they look.
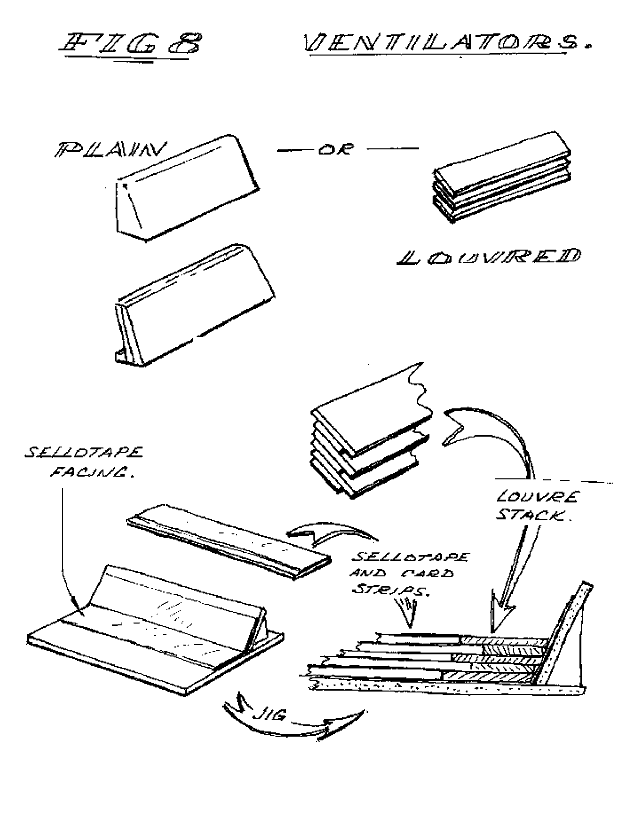
Two methods; one from card the other from polystyrene sheet.
For the card method we need a jig. Piece of thicker card with a second piece forming a stop. Inner faces are covered with adhesive tape. Prepare a few strips of card about 1 inch wide and cover with adhesive tape. Adhesive tape is great stuff. It not only repels common glues but also Epoxy and polyester resins. Stick it to wood or cardboard to make quick moulds.
Prepare some strips of card the intended width of a louver slat and some slightly narrower strips. lay a strip of card along the base of the stop.
Glue one of the narrower spacer strips on top and use a pair of the taped strips to hold them up to the stop. Repeat for next layer, and the next. Allow to dry and remove from the jig.
Fortunately there is an easier way. Take a handsaw and put it in the vice teeth up. The teeth should be just proud of the jaws. My pruning saw is fine for this since it has a narrow blade.
Clamp a wooden block to the blade close up to the jaws to act as a guide. Take a strip of plasticard (polystyrene sheet) about 12mm wide and 3mm thick and at least 4 inches long. Backing it up with a strip of wood, work the sheet to and fro at right angles to the teeth. The teeth will scrape a set of triangular louvers into the plasticard. Make some spares while you are at it. QED (quite easily done)
By the way, the same method, using hacksaw of appropriate pitch, will produce sets of louvers for decorating plastic diesels. Make louvers in 3mm sheet, frame in 1.5mm, leaving projecting louvers.
The Coach Ends
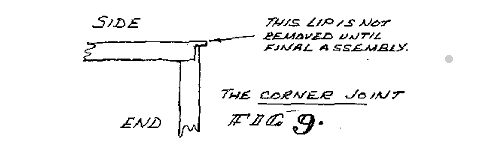
If the coach ends have windows they must be laminated like the sides. If they are blank, time may be saved by using thicker card or 3mm ply but having an outer face form our standard thin card. This not only provides a surface in common with the rest of the coach but also provides a projecting lip to cover the ends of the sides on assembly.
Hopefully fig 9 clarifies matters. Note that the projecting end of the coach side will be trimmed of after final assembly.
If it is an older coach having square cornered beading which is inset within the area of the coach end, it is easier to apply the beading as strips
Applying Shellac
Now retire to the shed, garage or wherever the Domestic Dragon is unable to detect the smell of meth's. Do not judge her sense of smell by your own. Mine can detect beer at a hundred paces, whisky at half a mile and B.O. ten seconds after I exit the shower.
Carry out the shellac routine but despite the temptation, do not glue the corner joint yet.
Slop a coat of shellac on to the coach side. We need the runny, milky consistency here. Turn it over and do the other side. Turn it over. By now the first coat will have sunk in. Do not wait for it to dry but slop on another coat. Turn over. Same again. Continue to and fro until the side refuses to take any more.
Leave to dry out thoroughly. All the little whiskers should now feel crisp to the touch. Rub over lightly with fine steel wool and clean up window apertures with the Domestic Dragon`s abrasive claw sharpeners. Dab with damp (not soaking) kitchen towel to remove dust.
Painting
Now is the time to paint the coach side. A coat of grey primer will show any blemishes, which can be dealt with before proceeding. Paint with your chosen colour and put away to really harden off
Windows
Cut windows to fit the pockets and try them in place. Cheap CD cases provide the window material.
I am sure that by now any interest has long since died and that I am now flogging a moribund equine quadruped. I will therefore try to wrap things up as quickly as possible. So without further ado.
Floor and bulkheads.
The floor is usually made of (3mm) ply or thick picture mounting card and sits between the sides and ends. Upon this are erected the bulkheads and seat frames also of thick card.
Do not rely on the curve at the top of the bulkhead to support the roof. It won`t. Cut the bulkhead short about (5mm) below the top of the sides and make use of the extra space to make a decent roof.
Slop a couple of coats of shellac on the floor and bulkheads but don`t rub down. We need to be able to glue seats and panelling in place.
Scene 4. Internal detail

The internals of the coach are best completed now while access is easy. Furnishing is down to the individual modeller but I will mention a few favourite materials. For internal wood panelling I prefer l/32 inch balsa.
I like to treat a whole sheet at once and keep it in stock. A coat of wood stain to choice is followed by a couple of coats of shellac, of paint like consistency, on one side only. After rubbing down that side is given two or three coats of clear satin varnish rubbing down between each. This material cuts easily, is pre-vanished and the back is rough enough to take glue.
Seats
These are simply card benches supporting seat squabs and backs. The squabs themselves are pieces of card covered with the appropriate materials.
Cloth seat coverings. I like the effect of the fine velvet hair ribbons which come in a wide range of colours and which are very cheap.
There are many other ribbons available including those suitable for carpets.
Leather. Can be card or from balsa, carved to shape, covered with tissue and painted with gloss paint. Polish with black wax boot polish to get the leather look.
American cloth. Cover with tissue paper and paint gloss black. A coat of satin varnish reduces the glitter of the gloss paint.
Body Assembly
Only after the internals are finished to your satisfaction should you fit the sides. For this job I prefer epoxy resin for its gap filling ability. Others will have other preferences. Lay the side flat and glue the floor ,end and bulkhead sub assembly in position. Leave to set under judicious weighting. Repeat for other side. Now at last, trim off those annoying tabs on the end of the sides and fill any cracks.
Roofs (prototype and model)
Most coaches have roofs. Most models have rotten roofs.
Most of the problems with model coach roofs are due to the roof being too thin. This arises from lack of observation. If one wishes to model a coach roof, go look at a real coach roof not someone else`s model.
I have seen many models with curved thin marine ply or even bent tin roofs. Remember that due to our relatively elevated viewpoint the roof is a very prominent feature.
A prototype roof in our period was quite thick. Thick enough to walk on and that means at least an inch. It was usually tarred and covered in canvas laid in transverse strips with around a 3 inch overlap.
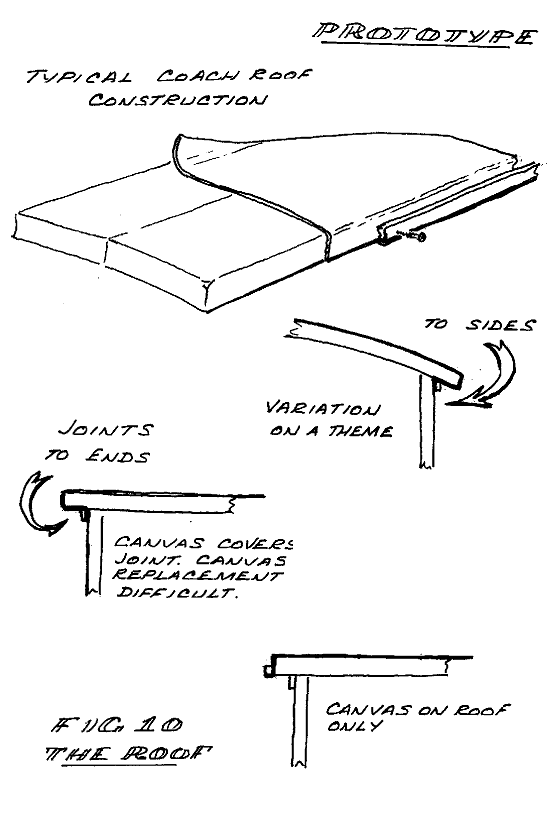
Edges would either be turned under and nailed in place or more usually covered by a wooden strip or both. see sketch 10. At the coach ends a further wooden strip would usually protect the body/roof joint.
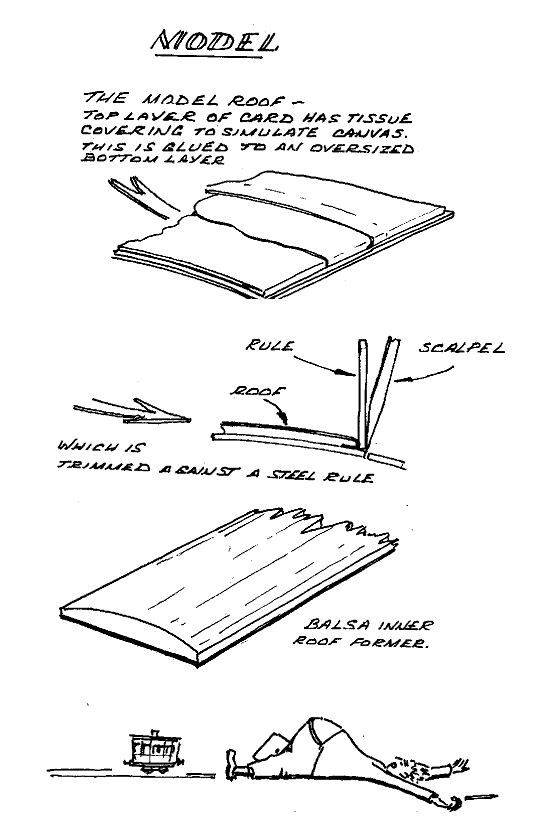
There are no really hard and fast rules but the visible edge of the roof needs to be around 0.050 inch to 0.060 inch thick (1.20 -1.5 mm) and that is at least two or three layers of our file card. Laminate as shown in the sketch using a couple of layers of card wrapped in simulated canvas glued to a generously oversized base layer.
Transverse strips of tissue handkerchief simulate the roof canvas although I prefer linen laid writing paper.
Our roof is still quite flexible so we must give it some support. A shaped balsa sub roof that fits inside the body sides and rests upon the tops of the partitions is ideal (Remember? We cut them short to allow for this.)
It is light and can be cut away to accept lighting wires etc. before assembly. An alternative is a framed construction in card but this does tend to be rather flexible. (Whangee in local engineering dialect)
So there you have it. The basic cardboard coach body. There is much more that could be said but there is no substitute for experience. Happy modelling.
Please do not think that the foregoing screed is/was a claim to any originality or special skills on my part.
Much was learnt from my late pal Donald Boreham and amplified by my many mistakes.